Friday, May 27, 2011

Happy Blogiversary to Crafts and Sutch

Hi, Friends!  I cannot believe that one year ago today I wrote my first post!  I'm getting all nostalgic! :)  I know many of you did not know me way back when so I thought it would be fun to show you how it all began! :)

If you click on the second pic, you can see what Crafts & Sutch used to look like. :)

Originally posted on May 27th, 2010:

Well, here I am! I'm so excited to make my very first post to my Crafts & Sutch blog. I've been truly inspired by so many crafty women in my life, and just recently discovered the craft blog world. Wow! I want to be a part of it too! :)

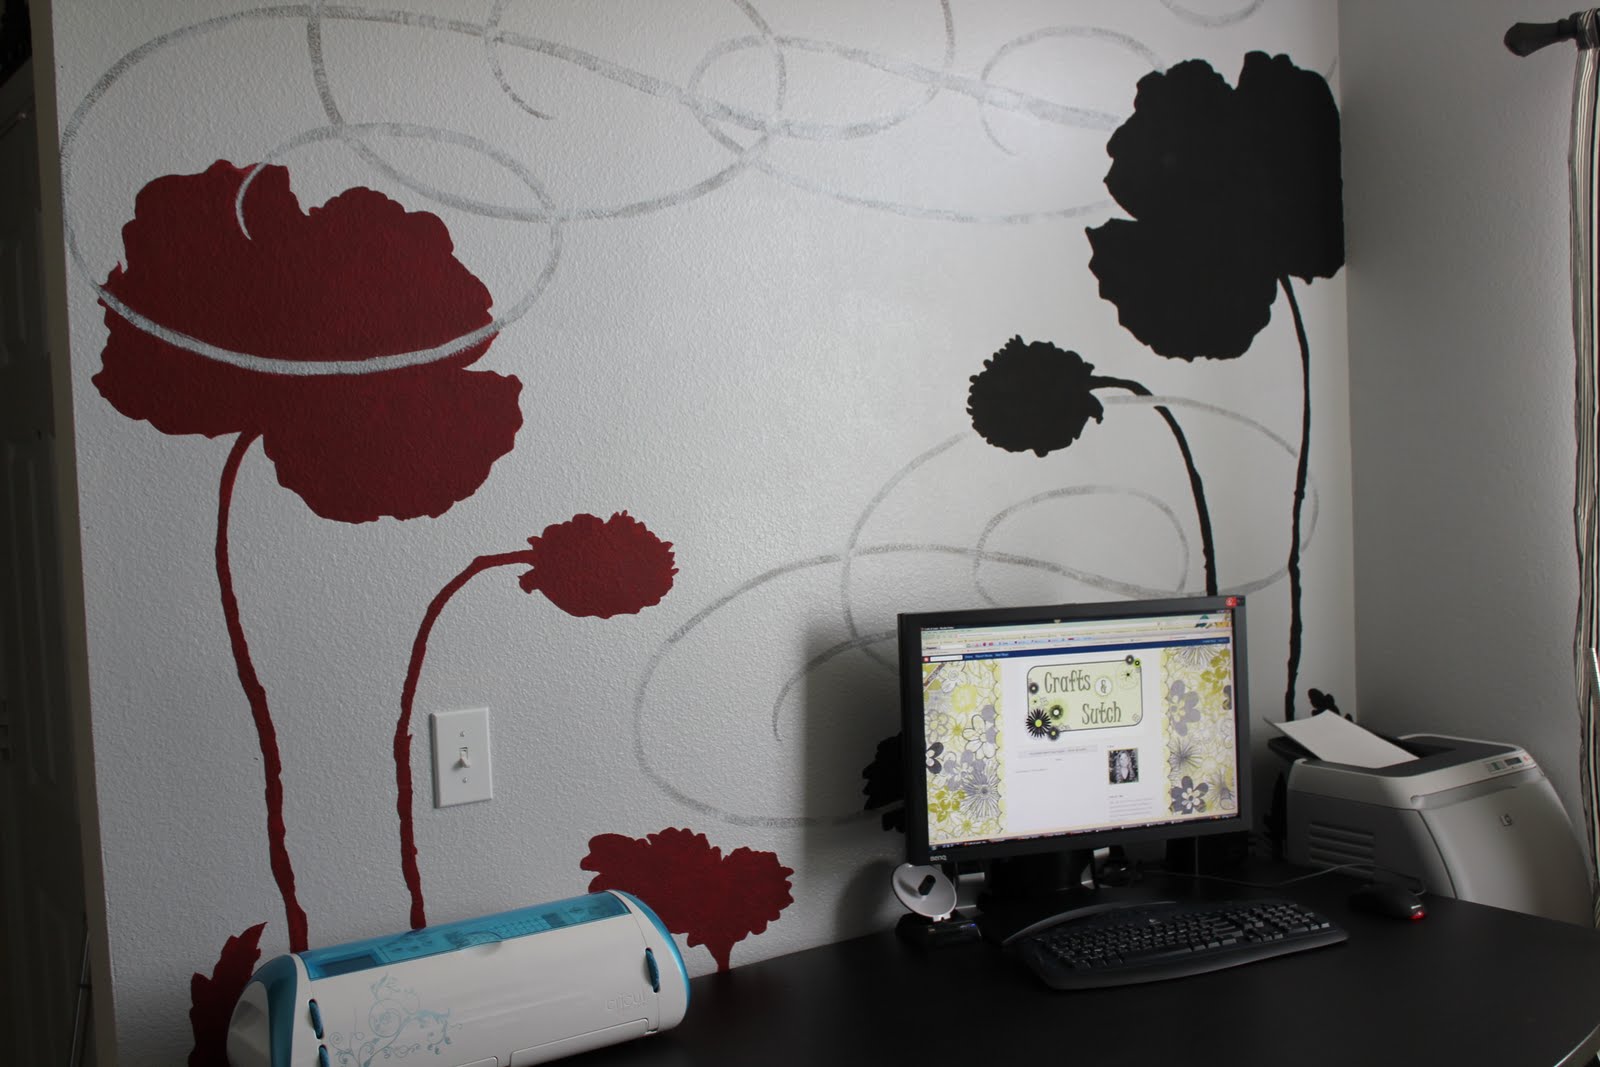
My first post has been a labor of love and has taught be sometimes Plan B is way better than Plan A. This past year I started to work from home and I needed a space that I wouldn't mind spending a lot of time in. I decided to paint a mural on one wall. I'm not an artist, just someone with a crafty bone and who isn't afraid to try something new.

I found an image on Google images of some modern flower silhouettes. I came up with my color scheme, and printed out my image. I borrowed a projector from my mom and traced the image on my wall (you could rent a projector from a teacher supply store or ask a teacher friend). I painted it with your normal, run of the mill craft paint and simply filled in the lines! Easy peasy!

As soon as I painted the swirls, I knew they were way too busy and needed a softer appearance. I took the wall paint and dry brushed over the swirls to give them a distressed finish (Plan B).


I love how it turned out! The total cost for this project was $6.97 ($2.98 for three bottles of craft paint and 3.99 for some paint brushes)! Not too shabby for a work of art!

Have a wonderful three day weekend, Friends!


Photobucket

Friday, May 13, 2011

No Sew Bleached Sand Dollar Pillow

Hello, Sweet Friends!  I have missed you!  I'm sorry I've been MIA, but I have to admit I had hit a crafting brick wall until Delia invited me to join her Color My Summer series that she is hosting along with Kojo Designs.


I chose the color BLUE because it screams SUMMER to me...blue skies, cool pools, and crashing waves just make me want to pop on my sunglasses and soak up some summer sun.

I wanted to introduce a little bit of a beachy feel into my home for the summer, so I customized some fabric to create this sand dollar pillow in Caribbean blue!


You will need:  a pillow form or fiberfill, Heat n Bond, fabric scissors, disappearing ink pen, iron, fabric (I used broadcloth), a print out of your desired design, and a Clorox Bleach pen.


Start by cutting two pieces of fabric approximately 2" larger than your pillow form.  My pillow form was 14", so I cut my fabric 16" square.


Cut out the image and trace around it using the disappearing ink pen.  I found my image using Google, copied it into PowerPoint, enlarged it, and printed it.


Now trace around the lines using the Clorox Bleach pen.


Allow the bleach to work it's magic.  Let it soak in for about 10-15 minutes (or longer).


Then wash and dry the fabric. I love how the bleach spread unevenly giving it a more organic and natural feel.


While I could probably sew a straight line, I don't have a sewing machine. :( One of my favorite bloggy gals, Cassie from Hi Sugarplum!, made some no sew pillows awhile ago and I was instantly inspired to make one of my own.

Following the directions on the Heat n Bond package, fuse together three sides of the pillow (leave about 3/4 to 1" seam allowance on all sides).  I put the sand dollar image right side up, adhered the Heat n Bond strips, put the back of the pillow on top (like a little Heat n Bond sandwich), and ironed it together.


Turn the pillowcase right side out and press the seams.


On the open end, turn the fabric under and iron a crease to create a finished seam.  Apply the Heat n Bond to one side of the pillow (see image below), insert the pillow into the case, and then iron the last seam.


Plop the pillow on a bed or your sofa, and you are finished! :)  It's as simple as that!


I wanted to bring in the seas so I bleached the fabric with a sand dollar design, but this project could easily be adapted to fit into any decor...think monograms, floral patterns, stripes, etc.


I'm so thankful Delia invited me to join her fantastic series!  I adore my pillow.  It's soft, squishy and reminds me of the seas!  How are you getting ready for summer?

I'll be linking up to some of my favorite parties on my sidebar. :)


Photobucket

Saturday, May 7, 2011

Guest Posting @ The Scrap Shoppe

Hello, Sweet Bloggy Friends!  I know I haven't been hanging around Crafts & Sutch lately, but you can find me over at The Scrap Shoppe today!  Michele is on Bloggy Maternity Leave, and I'm helping out so she can spend some extra special mommy time with the new little man in her life!  Congratulations, Michele! :)


I'm sharing a photo cube that I made for the monkey's grandmothers last Mother's Day.  If you are still looking for something for tomorrow, it's a quick and affordable gift that is sure to please! :)

Here's a sneak peek:


Have a wonderful weekend! :)


Photobucket