Tuesday, March 29, 2011

Sutch an Inspiration

Hi and Happy Tuesday! :)  I've been a huge slacker when it comes to Sutch an Inspiration, so I'm making up for it today with a whopping double dose of inspiration! :)  These are ideas I've earmarked from the past couple of weeks.

I love this springtime banner Holly made over at 504 Main!  It has so much spunk and personality and is such a fun way to great your guests!


Carol over at The Answer is Chocolate made this chic ring from scrapbooking supplies and a ring blank!  A jewelry project that is simple, affordable, and beautiful is right up my alley!  :)  I love how the scrapbook paper looks like fabric.  That, combined with the sharp, black and white pattern really makes this ring look like a million bucks!


I want to make a pair of these Easter egg topiaries that Haley made at The Autocrat!  They would look beautiful on my mantle!  She did a fantastic guest tutorial over at Itsy Bitsy Paper to show us how she made it.


I think this egg crocheted garland that Mama Michie's Musings made is so sweet and simple.  She has an easy to follow tutorial and since I've been to Mandipidy's crochet boot camp, I know what all the terms mean! :)  This garland would look fantastic strung on your mantle, down a staircase, in front of a window, or wrapped around your kiddo's Easter basket.


Rachel over at Sun Scholars made this giant, flower pillow with cushy, super snuggley  fleece!  I think it is perfect for a little girl's room or even as floor pillows for a game room (and let them migrate into the living room for spring.)


We all know that I have a wreath obsession.  I'm okay admitting it.  I have it because of projects like this patch worked  kite frame wreath that Carlee shared over at Ladybird Ln.  I am over the moon about this project that she put together for under $5!  Does it make anyone else wanna sing "Let's Go Fly a Kite?"  No?  Just me?  Hmm... :)

I showed off Cyndy from The Exchange around Christmastime when she made some fantastic fabric covered topiaries from poster board.  Well, she put a spring twist on her project by wrapping the trees in moss!  Genius! 


I sure do adore a modern mirror!  Can you believe that Alicia from Thrifty and Chic made these from PVC pipe?  PVC pipe is affordable and comes in several diameters.  I don't think you could go wrong with this project because the visual impact is stunning!  P.S. I love the console table too!


Hello, Beautiful!  Nikki over at Kreative Knack "dressed up" an old dresser with a little elbow grease, some paint, and a cardboard stencil!  I've never refinished a piece of furniture, but this project makes me want to try.


Malia at Yesterday On Tuesday made these bright and cheerful fanciful Easter eggs!  She painted plastic eggs, added some sparkly glitter, and a sweet little sentiment on each egg.  She also has a tutorial to make that adorable, little sheet music peat moss bucket!


Ladies, thank you so much for always keeping me inspired! :)


Photobucket

Monday, March 28, 2011

Birthday Party Gift Idea

Hi Sweet Friends!  I hope you all had a fantastic weekend!  We had a weekend full of craftiness and family!  Kason was invited to an art themed birthday party this weekend and he had a ton of fun!

We were asked to bring art supplies for gifts rather than the "usual" gifts like toys and clothes.  Of course, me being the crafty gal I am, LOVED this idea and I ran with it!  This is what I came up with:


I filled a tackle box with all the artsy craftsy stuff a little girl could ask for:  watercolors and brushes, various sizes and colors of pom poms, pipe cleaners, construction paper, foam stamps, glittered foam stickers, crayons, sidewalk chalk, various stickers, and alphabet post it notes. :)


I found the tackle box at Wal-Mart for just over $5.00 and managed to fill it with lots of crafty goodies.  The whole kit cost less than $20.00.


You could also rummage through your craft stash to add items like scrap paper, stickers, etc. and save a few dollars! :)
 

I personalized the gift by cutting some vinyl with my Cricut.  I love that the apostrophe is an artist's pallet.


I finished it off with a polka dot bow and a handmade artist's pallet gift tag and paint brush.


Because the kiddos were going to be "gettin' artsy," it was requested they come in clothes they could get dirty.  I took this as an opportunity to make something new.  :)  Makes total sense, right?  Kason and I made an artist's pallet t-shirt just for getting dirty.  His hand print is the pallet and his thumb prints became the paints.  The hubs came up with the "handmade" slogan. :)


The monkey's favorite station was the painting station.  He stood in front of this easel for at least 30 minutes! Professional artist in the making if you ask me.  :)


Here is his t-shirt after the party. While the paints used at the party are washable, I love the "new" look of his handmade shirt.


I might have to borrow this idea for the monkey's second birthday! :)  He is definitely a creative little fellow!

I'll be linking this up to some of my favorite parties.  See you all tomorrow for a double dose of Sutch an Inspiration!


Photobucket


Here are some of the best recent articles on Crafts:

Origami Craft Ideas: Origami Wedding Craft Ideas via Craft Supplies
Customizable Cross-Stitch Projects: Cross-Stitch Projects via Martha Stewart Crafts
Popular Trends in the Arts and Crafts World: Arts and Crafts Trends: An Overview was recently featured on online msw degree programs
Fun Spring Crafts for Kids: Spring Theme Crafts via Toddler Crafts

Thursday, March 24, 2011

Keep Calm and Shine On {Printable}

Hey Y'all! :)  I hope you are having a most spectacular week!  I'm in Colorado for a super duper quick trip.  I flew in yesterday and I'll be back home tonight. :)  I can't stand to be away from the monkey and the hubs for too long.

I've got a confession.  I'm in a HUGE crafting rut.  I've been in one for quite some time, and I'm having a hard time pulling myself out.  Most of it is just life getting in the way...you know how that goes...

Anywho, I wanted to give myself a little encouragement and motivation so I made myself a printable. :)


If you need a little encouragement too or if you're just in a sunny kind of mood, then feel free to snag this sweetie! :)  Click on the image to open it in full resolution, right click on the image and select Save Image As, save the file, open it, resize it if needed, and print.  Both of these files are huge!  They are big enough to be printed as posters! :)

I'll be linking this up to some of my favorite parties!

Photobucket

Sunday, March 20, 2011

Baby Shower Decorations to Decor

Hello, Friends!  Happy spring!  How was your weekend?  :)  I'm sorry I've been MIA.  The monkey was sick last week and was in need of some extra Mommy time, so my "fun" job (and my real job) were put on a bit of a hold.  We had a wonderful weekend that ended with a family dinner at our casa.  The hubs, the monkey, two Memas, one Nonno, one Papa, me, a pot of spaghetti, a big bowl of salad, and two pies made for one perfect evening! :)

Last weekend a friend of mine hosted a baby shower for her sister and she asked if I would make a few decorations.  The theme was "Under the Sea" to match the nursery.  I used the bedding as color and image inspiration.  Take a peek:
Isn't it too cute?!  I just love that little octopus.  He is adorable!

My first project was inspired by Michele over at The Scrap Shoppe.  She made these diaper and washcloth cupcakes!  I had never seen them before and instantly knew that they would soon become my GO TO baby shower craft.


I followed Michele's easy tutorial and ended up these cuties.  I wish with all my might I could have found my pinking shears (I hunted for a new pair, but wasn't willing to spend $25 dollars on scissors...I just couldn't do it).  I think the pinking detail adds the perfect finishing touch!


I topped each cupcake off with a pom pom cherry!  An idea I got from Lindsey at BABY BOKY.

Then I made a banner to display at the shower and then move to baby Ian's room when he comes home.  I used chip board circles that I got from the $1 bins at Michael's (all 5 for a $1).


For the octopus and turtle on each end, I uploaded the bedding image into Photoshop, used it to generate a black and white image, converted it to a .svg file using InkScape, and then cut the image using my Cricut.  It sounds super complicated, but it's just a matter of a few clicks.  Once the image was cut, I used a marker to add the detail.  Again, I used the bedding as my guide.


I tied it all together with some "bubble" ribbon.

Next, I made a diaper wreath to greet guests as they came to the shower.  This wreath would also look adorable hanging from the hospital room door and then the "I" can be removed and used as a door decoration for Ian's nursery.


I also made a signature frame so guests could sign with their welcoming wishes for baby Ian.  It's great for mommy to take to the hospital too.  This is a super easy and affordable keepsake.  I was able to make this 11x14 keepsake frame for less than $15.


Of course, you know I had to make Ian his own stylish freezer paper stenciled onesies!  I was inspired to create the "I" onesie by one I saw over at Gabriel's Good Tidings.  The star print onesie got a rockin' guitar and the nautical stripe onesie got a super cute whale.  These were a fabulous find at Wal-Mart for just $2 each.


I love to create decor that serves double duty for mommy and baby later!  Everything can be used as decor in the nursery or by baby after the shower!

Photobucket

Tuesday, March 15, 2011

Kiss Me I'm Cute T

Hello sweet friends!  I'm not sure about you all, but this time change has really done a number on me this year.  I've been feeling super late the past few days. :)

I made this freezer paper stenciled shirt a few weeks ago, but the monkey got it dirty before I could get pics of it. :)


I wanted to make him a green t-shirt so he won't be pinched on Thursday. :)  The only green shirt I found had a pocket on it, so I just pretended it wasn't there.  I cut the stencil with my Cricut, ironed it on, and painted it with white fabric paint. 

While Kason is a fraction Irish, he definitely has more cute in him!

Photobucket

Monday, March 14, 2011

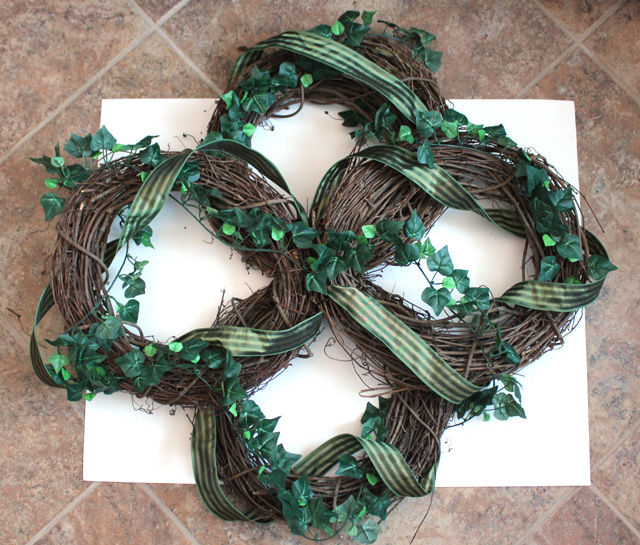
Quatrefoil Grapevine Wreath

Hello, Friends! :)  I hope you are having a great start to your week! 

As I've said before, I don't usually decorate for St. Paddy's Day, but this year I added small touches of green around the house.  I started with the Quatrefoil and Four Leaf Clover printable and now I've added this:


I wanted to keep the quatrefoil theme going because it's so classic and add touches of green to the wreath.  This project was extremely affordable for the scale of the wreath!  I made it for just $16.00.

To get started, you will need: four grapevine wreaths, thin brown ribbon or wire, greenery garland, and ribbon.


Lie two wreaths side by side and tie them together with the ribbon or wire.  Be sure to make the knot snug.


Repeat the same process with the other two wreaths.  Then lay one set of two on top of the other to make the quatrefoil.


Now securely tie these together with the ribbon or wire.  I went around and through the grapevine.  The picture below is a close up of where I tied the wreaths.


Now weave the greenery garland in and around the wreath.  I simply tucked the ends of the garland into the wreath.  I did not tie it.  This will make it easy for me to quickly change the appearance of the wreath with the seasons.


Now do the same thing with the ribbon.  Again, I tucked the ribbon ends into the grapevine.


And there you have it!  I hung the wreath above the fireplace in the middle of a decorative wrought iron wall hanging.  It reminds me of an old garden gate.  :) 


The all green wreath is perfect for St. Paddy's Day, but I plan on changing out the ribbon and adding some fabric flowers for spring. :)

I'll be linking this project up to some of my favorite parties!


Photobucket