Sunday, December 12, 2010

Sweater Trees

Howdy!  I hope you've had a most wonderful weekend!  I've been trying to get all of the presents wrapped and under the tree.  I'm such a procrastinator when it comes to wrapping.  I've been know to shove presents and tissue paper into Christmas bags outside my mom's house on Christmas Eve right before we open gifts.  :)

In case you missed me over at Pocket Full of Pink last week, here is the tutorial I shared on upcycling sweaters into Christmas decor!

Hello Pocket Full of Pink Readers!  I'm Erin from Crafts & Sutch and I'm so very happy to spend some time with you today!
I love all things crafty and have been diagnosed with "I can make that" syndrome. I am constantly inspired by the things I see, so I like to create a little bit of everything. :) Today we are getting into the holiday spirit and making some sweater trees!


To get started, you will need a paper mache or Styrofoam tree form, an old sweater, scissors, a glue gun and glue, straight pins, and a pencil or pen.


Lay the tree form down on the sleeve of the sweater with the top of the tree at the wrist end of the sweater.  Cut across the sleeve approximately 1" below the end of the tree.


Put the tree into the sleeve and create a slip cover for it by pinning down the length of the tree.  The sweater should be snug, but not tight.


Now fold the end of the sweater under the form and glue with the glue gun.


Remove the excess sweater by cutting along the inside of your pins.


It will look like this.  Take the pencil or pen and draw a straight guideline for yourself down the length of the tree.  This is where you will glue the sweater together.


Glue the sweater along the guideline.  Create a neat seam by pushing each side together.


This is what the back of the tree will look like after you have glued the sweater in place.
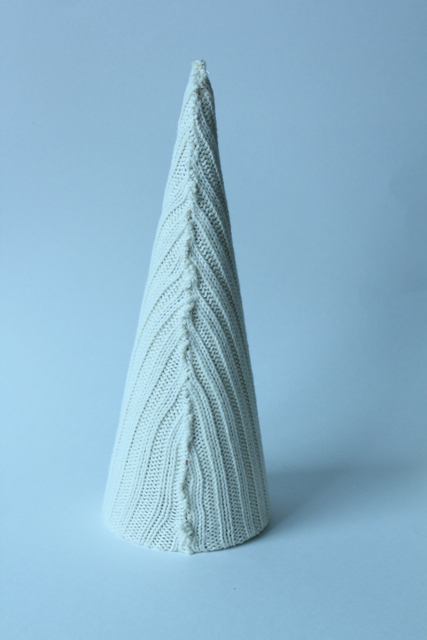

And here is the finished product...along with a friend!  I am loving how these turned out.  They were super easy to make, quick, and affordable!


Thank you so much for letting me hang out with you today and thank you to Karen for having me!  I hope you all will stop by Crafts & Sutch sometime and say hi! :)

I'm linking up to these awesome parties!

Photobucket

Friday, December 10, 2010

Knotty Bag

Happy Friday, Friends!  I hope you had a GREAT week!  I've been in Arizona for the past week on business and am happy to be home and spending the weekend with the hubs and the monkey. :)  In case you missed it, here is the post I did last week over at The Scrap Shoppe for her Homemade Christmas event.  Enjoy!

Hello Beautiful Scrap Shoppers! :)  I cannot tell you how excited I am to be here and spend some time with you today!  I'm Erin from Crafts & Sutch. I love all things crafty and have been diagnosed with "I can make that" syndrome. I am constantly inspired by the things I see, so I like to create a little bit of everything. :)
Today we are making a gift any girl would be happy to receive...a knotty bag!


I got this super duper EASY idea from Martha's web site.  There are two ways to create the bag and I used both of them to achieve my desired look.

Here is what you will need to get started:  a scarf or piece of fabric (at least 36" inches square) and a pair of purse handles.  I got my scarf at a thrift store for a dollar and picked up the handles at Joann's for $4.20 (40% off coupon).


 Start by placing your scarf or fabric face down and tie a knot in each corner. 


Leave about a 5" tale on the end of each knot because we will tie them again later.  Here is what your bag should look like so far.


Now take two adjacent corners and slip them through the front of one of the handles.  Then pull them out to opposite sides.


Take each corner and wrap around to the front of the handle and tie a knot.


Repeat this process with the other two corners and you are all finished!


Can you believe how easy that was?!  I love how it's super slouchy and has a vintagey feel.


This is essentially two great gifts in one...a fun bag and a fantastic scarf! 


I have loved spending some time with you today!  I hope you'll stop by Crafts & Sutch and say hi! :)  Thank you so much, Michele, for letting me come visit!  I wish you all a very happy holiday season!


Have a happy weekend! :)  I'll be linking up to these fantastic parties!


Photobucket

Wednesday, December 8, 2010

Guest Posting @ The Scrap Shoppe

Hello there!  I hope all is well and you are having a super fantastic week!  I'm away on business, so I apologize that SUTCH an Inspiration will be late this week.  However, I do have a super duper cutie holiday craft over at The Scrap Shoppe today!


Be sure to stop by and say hi! :) 


Photobucket

Monday, December 6, 2010

Blog Swap {Pocket Full of Pink}

Hello Dear Friends! :)  I hope you had a most excellent weekend!  I finally got my Christmas decorations up!  YAY!  You'll be seeing them later this week.  In the meantime, I'm swapping blogs with Karen from a Pocket Full of Pink!  She's hanging here today and I'm hanging there.  :)


I am so excited to be here on Crafts and Sutch. Thanks for having me Erin!  My name is Karen and my blog is Pocket Full of Pink.  I love to make crafts, have giveaways, and have lots of fun!  Come by and visit sometime!

I came up with this super cute and EASY paper Christmas tree.  Here is what you need:

-2-12 x 12 sheets of Christmas Scrapbook paper, or whatever design you want.
-Glue Gun
-paper mache tree (you can get them from Oriental Trading), or a syrofoam tree (from Joann's or Hobby Lobby or Michaels) will work too.
-paper cutter
-ribbon
-paint (if you are using a paper mache tree with stand like mine.)  I used Delta Ceramcoat- Burnt Umber
-pencil

1.  Cut your paper into strips about 1/2 x 2 1/2 inches.  You will use just about all of the 2 sheets of paper.


2. Take your paper and roll it around the pencil nice and tight.


3.  Start gluing the paper strips on with a glue gun.  Careful and don't burn yourself.  Trust me I know from experience!  Go all the way around the tree.  Move up to the next layer, making sure there is no white showing through.  When you glue on the next layers, do it randomly, so they don't look like straight rows.  Make sense?


4.  If you use a paper mache tree, paint the stick and the bottom brown.  I also sanded around the edges of the pot (or whatever that thing is!) a little.

  
5.  Glue a pretty ribbon on top.


This took me a little over an hour to do.  I love how it turned out and it didn't cost me anything.  It was stuff I already had on hand!

Thanks so much for having me Erin!  Stop by and check out my blog sometime.  I love visitors!
Isn't this the cutest?!  I love how she used double-sided paper so you can see the light green peeking through the rolls.  Karen, thanks so much for sharing this little guy!  Please be sure to go and visit Karen at a Pocket Full of Pink!  She always has great paper crafts and giveaways!


Photobucket

Guest Posting @ Pocket Full of PInk

Hello Bloggy Friends!  I hope you had a super duper fantastic weekend!  Please swing by Pocket Full of Pink today where I'm sharing these mighty cute Christmas trees! :)


Photobucket