Showing posts with label paint. Show all posts

Friday, May 27, 2011

Happy Blogiversary to Crafts and Sutch

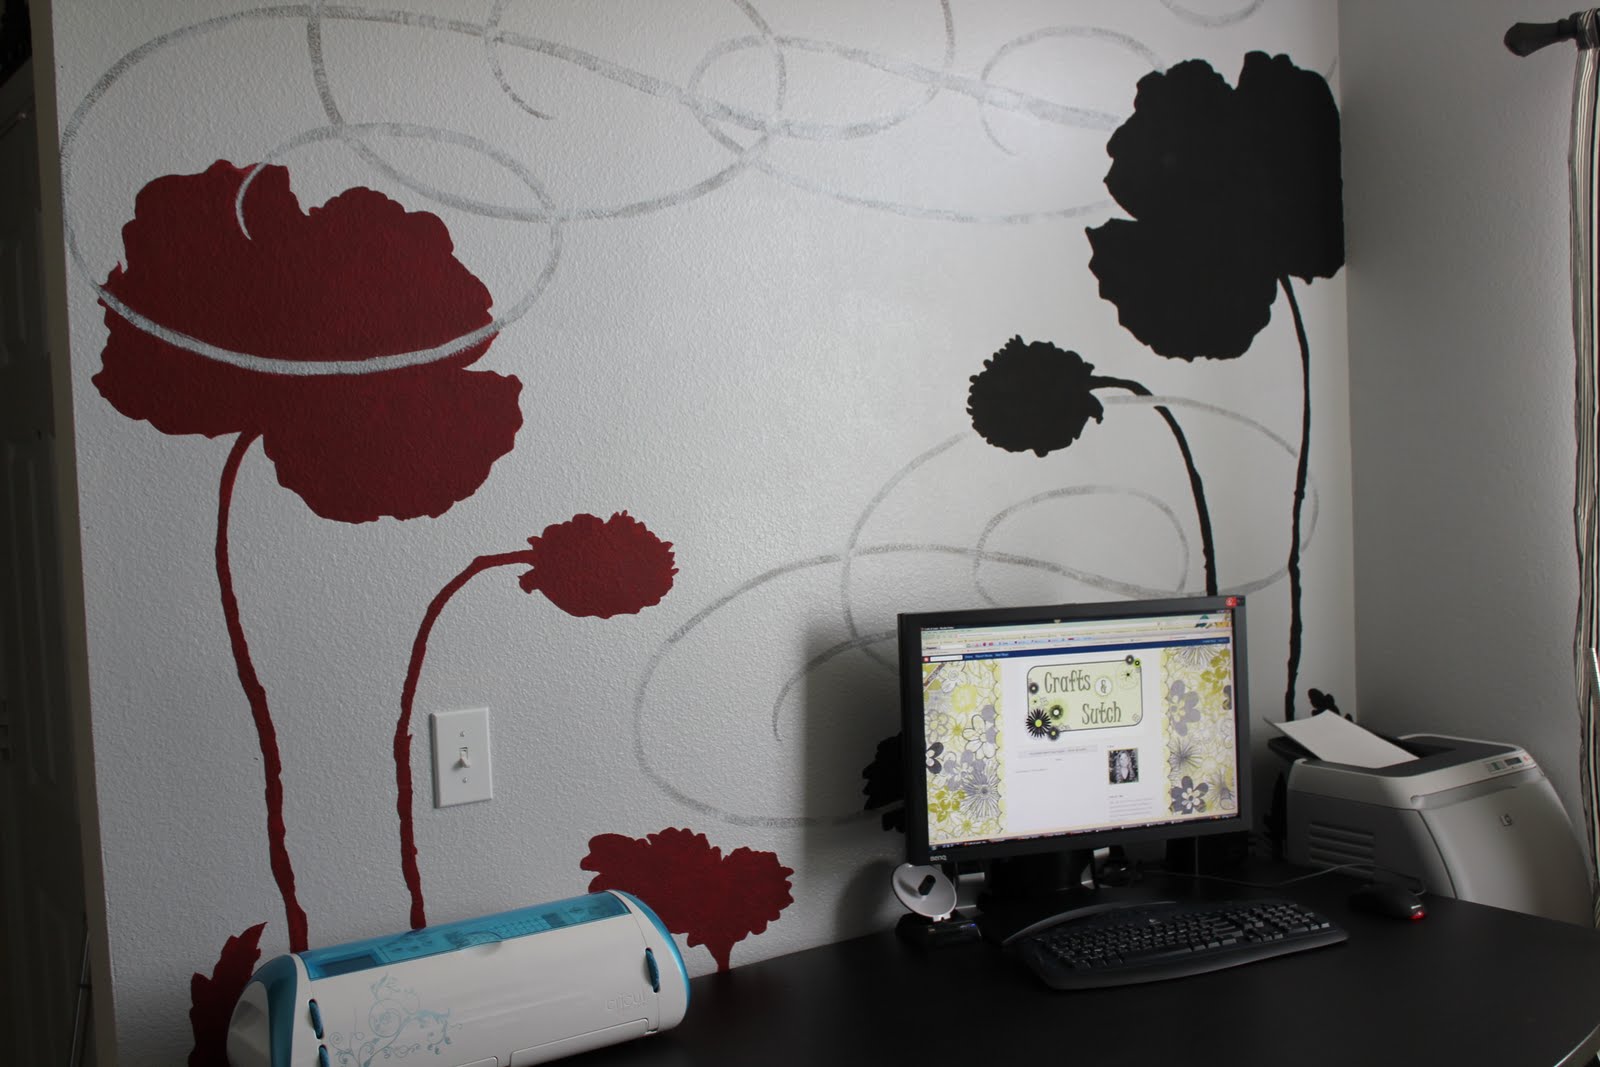
Hi, Friends!  I cannot believe that one year ago today I wrote my first post!  I'm getting all nostalgic! :)  I know many of you did not know me way back when so I thought it would be fun to show you how it all began! :)

If you click on the second pic, you can see what Crafts & Sutch used to look like. :)

Originally posted on May 27th, 2010:

Well, here I am! I'm so excited to make my very first post to my Crafts & Sutch blog. I've been truly inspired by so many crafty women in my life, and just recently discovered the craft blog world. Wow! I want to be a part of it too! :)

My first post has been a labor of love and has taught be sometimes Plan B is way better than Plan A. This past year I started to work from home and I needed a space that I wouldn't mind spending a lot of time in. I decided to paint a mural on one wall. I'm not an artist, just someone with a crafty bone and who isn't afraid to try something new.

I found an image on Google images of some modern flower silhouettes. I came up with my color scheme, and printed out my image. I borrowed a projector from my mom and traced the image on my wall (you could rent a projector from a teacher supply store or ask a teacher friend). I painted it with your normal, run of the mill craft paint and simply filled in the lines! Easy peasy!

As soon as I painted the swirls, I knew they were way too busy and needed a softer appearance. I took the wall paint and dry brushed over the swirls to give them a distressed finish (Plan B).


I love how it turned out! The total cost for this project was $6.97 ($2.98 for three bottles of craft paint and 3.99 for some paint brushes)! Not too shabby for a work of art!

Have a wonderful three day weekend, Friends!


Photobucket

Wednesday, March 2, 2011

Patina Penny Ring

Hello Friends!  I hope all is going well!  I've putting off my "real" work to work on my "fun" work.  :)

Here are the fruits of my labor, a project that will give you a little luck everywhere you go! 


This project was very simple and cost just a few pennies (ha)!  :) You will need Folk Art craft paint in Patina, some super duper glue (I used E-6000), a penny, and a ring blank.  Not pictured:  a piece of paper towel or a cotton ball or a Q-tip.


Take a piece of paper towel and blot the paint onto the penny.


Now wipe off the majority of the paint, leaving just a little in the crevices and around the outside of the coin.

Repeat the previous two steps to build up the "patina" on the penny.  It will take just a few minutes for the paint to dry.


Flip the penny over and use E-6000 glue to adhere the ring blank to the back of the penny.


Let the ring dry overnight and then slip it on your finger!  Now you'll be carrying some luck around with you where ever you go. :)


I'll be linking this up to some of my favorite parties!  See you all tomorrow for a dazzlerific giveaway!

Photobucket

Friday, January 28, 2011

Freezer Paper Stenciled Valentine's Day T-shirts

Hello and Happy Friday!  I cannot believe we are in our last weekend of January.  It just flew by and now we are heading into a month of red, pink, and love. :)

I really wanted to get the monkey a Valentine's Day t-shirt, but I had a hard time finding one for a boy.  They have tons of super cutie girlie stuff, but not a whole lot for little guys.  I decided to make my own. :)  Well, I couldn't make just one t-shirt, so I made one for each of the kiddos at Kason's daycare.


I think these are adorable and super affordable!  I got the t-shirts at Wal-Mart for $3.50.  I used my Sure Cuts a Lot software to design each of the emblems, and cut the freezer paper with my Cricut (you could also trace the design onto freezer paper and cut it out by hand like I did HERE). 

I first heard about freezer paper stenciling from Cheri at I am Momma - Hear Me Roar, and I always follow her easy tutorial HERE.

I used plain ole craft paint and mixed it with Delta Ceramcoat Textile Medium.  The textile medium turns any acrylic paint into a washable fabric paint.  How cool is that?


Here are the designs:

The heart breaker design is perfect for any little man in your life.


This is Kason's Love Rocks T...it matches his mailbox. :)


 I LOVE this peace and love T!  The L appears a little dark in the pic, but it is actually red.


I think the tic-tac-toe, hearts in a row T is too sweet. 


This one is by far my fav!  I love the color combo and the sweet, "hidden" message.  You know if you mouth the words olive juice it looks like you are saying I love you! :)


I think the kiddos are going to look adorable for Valentine's Day!  I can't wait to see pics of all of them in their t-shirts!


I love freezer paper stenciling!  It is super simple and pocketbook friendly. You could easily add a little Valentine's flair to your home by using the same technique for dish towels, place mats, napkins, or even on a canvas for some wall art!

I hope you all have a wonderful weekend! 

I'll be linking up to these wonderful parties!

Photobucket

Wednesday, January 26, 2011

Valentine's Day Mailboxes

Hi Friends!  I hope you all have been well!  I've missed you!  These past two weeks have been extremely busy at work, so I haven't had much time to create.  Now that things have died down a bit, I've had a chance to finish up this project that has been sitting half done on the shelf in my office. :)


This project has been on my TO DO list since last year!  I was inspired by Stephanie Lynn over at Under the Table and Dreaming.  She is always a source of inspiration for me, and this was too cute to pass up!  She made this Pottery Barn inspired version for her little boy. 


For this project, you will need:  a mailbox (small - Target $1.00 bin, large - Michael's), wooden candlesticks, round plaque for base, super glue, craft paint, paint brush, and embellishments (depending on the embellishment you use, you might also need Mod Podge and a foam brush).


I gathered some "prizes" for Kason's (a.k.a. The Monkey) mailbox.  I didn't spend a lot of money.  In fact one of the prizes is a Happy Meal toy from my lunch one day. :)  Other prizes include: crayons, socks, Little People figures, a silverware set, a stuffed monkey, and fruit snacks.


To get started, construct the bases by stacking and gluing the candlesticks on top of one another and then gluing to the round base.


Each base got a coat of white paint.


While the glue and the paint are drying, decorate the mailbox.  I used my Cricut and vinyl to create Kason's Love Rocks themed mailbox and Keith's binary code mailbox.


 Creating Valentine's Day things for a guy is a little challenging.  Even though Keith said I could cover his mailbox in hearts (so love him), I knew that I wouldn't be happy with it.  He is pretty technologically savvy, so I decided to go with I love you in binary code.  I cut it out on vinyl using my Cricut and changed out some of the zeros and ones for I "heart" U. :)


I Mod Podged some floral embellishments onto mine and all of the bases got dressed up with a little craft paint.


I love how each one reflects a little bit of our personalities and I can't wait to start filling these (and opening mine) on the 1st of February!


I love the little "rock hand sign" on Kason's!  Too cool!


Is love in the air around your home too?

I'll be showing these off at my favorite parties!

Photobucket

Monday, December 6, 2010

Blog Swap {Pocket Full of Pink}

Hello Dear Friends! :)  I hope you had a most excellent weekend!  I finally got my Christmas decorations up!  YAY!  You'll be seeing them later this week.  In the meantime, I'm swapping blogs with Karen from a Pocket Full of Pink!  She's hanging here today and I'm hanging there.  :)


I am so excited to be here on Crafts and Sutch. Thanks for having me Erin!  My name is Karen and my blog is Pocket Full of Pink.  I love to make crafts, have giveaways, and have lots of fun!  Come by and visit sometime!

I came up with this super cute and EASY paper Christmas tree.  Here is what you need:

-2-12 x 12 sheets of Christmas Scrapbook paper, or whatever design you want.
-Glue Gun
-paper mache tree (you can get them from Oriental Trading), or a syrofoam tree (from Joann's or Hobby Lobby or Michaels) will work too.
-paper cutter
-ribbon
-paint (if you are using a paper mache tree with stand like mine.)  I used Delta Ceramcoat- Burnt Umber
-pencil

1.  Cut your paper into strips about 1/2 x 2 1/2 inches.  You will use just about all of the 2 sheets of paper.


2. Take your paper and roll it around the pencil nice and tight.


3.  Start gluing the paper strips on with a glue gun.  Careful and don't burn yourself.  Trust me I know from experience!  Go all the way around the tree.  Move up to the next layer, making sure there is no white showing through.  When you glue on the next layers, do it randomly, so they don't look like straight rows.  Make sense?


4.  If you use a paper mache tree, paint the stick and the bottom brown.  I also sanded around the edges of the pot (or whatever that thing is!) a little.

  
5.  Glue a pretty ribbon on top.


This took me a little over an hour to do.  I love how it turned out and it didn't cost me anything.  It was stuff I already had on hand!

Thanks so much for having me Erin!  Stop by and check out my blog sometime.  I love visitors!
Isn't this the cutest?!  I love how she used double-sided paper so you can see the light green peeking through the rolls.  Karen, thanks so much for sharing this little guy!  Please be sure to go and visit Karen at a Pocket Full of Pink!  She always has great paper crafts and giveaways!


Photobucket

Monday, November 15, 2010

Fall Decorating {Mantle}

Hello and happy Monday!  I hope you all had a wonderful weekend!  Mine had a rocky start with a sick baby, but got better and better throughout the weekend. 

Last night I finally finished up my mantle!  I had taken down the Halloween stuff at the beginning of the month but struggled with this look until now.  :)

The staple on the mantle throughout the fall is the berry garland.  It is full of red, orange, and yellow berries and I stuff it a little more with fall leaves, and small pumpkins and gourds.  Then I pulled out this antique window pane (which has been sitting in my garage since I bought it a few years ago) and hung a beautiful fall wreath from the top with an orange ribbon. 

On either side of the window pane, sit chocolate pumpkins (see side note below), glass beaded pumpkins, and sunflowers.


Side note:  Do you ever feel like you share crafty brain waves with someone?  :)  Sometimes I'm hunting around blogland and see a project that is exactly what I had envisioned making or someone will leave a comment, "I was just going to make that!"  It goes to show you that great minds think alike!  I think Michele, from The Scrap Shoppe, and I were sharing crafty brain waves when we both decided to spray paint pumpkins brown!  Check out her's HERE.  She turned her brown pumpkin into a fall vase.


I decided to give these guys a coat of spray paint because they were cream and got lost against the creamy wall.  I wanted something dark and appropriate for fall so brown was the way to go (plus I already had a can from spray painting Kason's nursery furniture).  Then I dressed each one up with an orange ribbon.


Coming up this week:  Sutch an Inspiration, my fall credenza, and our Christmas card! :)  Have a fantastic week!


Photobucket

Monday, October 18, 2010

Mossy Fall Plaques

Hello, All!  Happy Monday!  I hope you had a great weekend!  We were able to spend time with family and that is always a good thing. :)

For this week's EEK WEEKS project, I thought I would tone it down and make something natural that could be displayed in your home for the entire season.


I'm sorry I do not have a full photo tutorial, but this was super easy to make so I'll just talk you through it. :)


You will need three wood plaques, spray paint (I used brown), scrapbook paper, Mod Podge, craft foam brush, scissors, moss sheet, ribbon, and a hot glue gun.  Optional supplies:  distressing ink and jute.

To begin, spray the plaques with spray paint.  While the paint is drying, cut out fall shapes from the moss sheet.  Have you seen this stuff?  I found it at the Dollar Tree, and I only used one sheet for this project!


I found images of a pumpkin, an acorn, and a leaf on Google images, printed them out, cut around the images, and used the cut outs as stencils to cut the moss sheet.

Measure the top of the wooden plaque and cut the scrapbook paper to fit, distress the edges of the paper with ink, and then Mod Podge the paper to the plaque.

Hot glue the moss to the plaque and embellish with jute (a curly vine for the pumpkin, a rim for the cap of the acorn, and veins for the leaf).

 Hot glue ribbon to the back of the plaque and hang on a nail.  I really wanted to hang the plaques from decorative knobs, but wanted to keep my budget in mind so I hot glued a button to the end of each nail.  Personally, I think it is my favorite part of the project! :)


I'll be sharing this project at these super wonderful PARTIES!

I have to admit that I'm a little sad there is only one more EEK WEEK project left!  I do promise that is will be positively pumpkiny deliciousness!  :)

Coming up this week:  Sutch an Inspiration on Tuesday, a giveaway on Wednesday, and a look at some of the fall decorations around my home on Friday.  Have a wonderful week!


Photobucket