Showing posts with label crafty. Show all posts

Wednesday, February 16, 2011

Menu Organizer and Recipe Holder

Hi Beautiful Bloggy Friends!  I hope you are having a wonderful week!  I don't know about you, but I'm ready for the weekend!

I've been on a cooking kick lately.  I really do not like to cook, but I know it is so much better for my family and our pocketbook if I do.  I've been making a valiant effort.  I'll head over to KraftRecipes.com, pick out my dinners, add them to my shopping list, and print it out with all of the recipes.  A week's worth of recipes and a shopping list equal several sheets of paper, so I came up with a way to help keep my weekly menu organized.


This project was so easy!  Here's what I did:  a scrapbook paper covered file folder holds all the recipes for the week.  I glued the outside edges of the folder together to create a little pocket.  I used my Cricut to cut out the label and the letters and spruced them up with a little distressing ink.


I Mod Podged scrapbook paper onto a metal sign (I found mine on clearance at Michael's, but I've also found them at the Dollar Tree), used my Cricut to cut out the word DINNER, and made some satin rosette magnets.


The magnetic board is the perfect place to display the recipe for dinner that night.


Now for the best part!  I used 3M Command strips to adhere these to the inside of one of my kitchen cabinets.  This cabinet is right next to my stove, so it stays open while I'm cooking and my recipe is always visible and up out of the way (so it doesn't get covered in dinner). :)

This system has been working brilliantly!  It's so fantastic knowing that dinner is already planned, I just have to pick out what I want to cook.  What do you think?  :)

Have a great weekend, Everyone! :)  I'll be linking up to these super parties!


Photobucket

Thursday, January 6, 2011

Bottle Cap Magnets

Yay for Friday! :)  I hope you all had a wonderful week!  I wanted to share a quick and affordable gift idea that was a huge hit for Christmas, but would make a fantastic gift for Valentine's Day too.

I saw these first over at Lemon Tree Creations and thought they would be the perfect gift for grandparents and aunts and uncles! 


I followed Tiffany's easy tutorial and found the cute, little tins at Wal-Mart.  They even had bows already on them.  Everyone thought they were the cutest and I couldn't resist making a set for me too.


I ended up buying a few more tins at Wal-Mart after Christmas because I love this idea.  I also found some non-Christmasy ones at Hobby Lobby on clearance a few days ago.  Hmm...what else can I put on bottle caps?  :)

I think any grandparent would love a set of these with all their grandkiddos on them for Valentine's Day, don't you think? 

Have a wonderful weekend! I'll be linking up to these fantastic parties! :)


Photobucket

Wednesday, December 15, 2010

Sweater Snowman

Hi Happy Friends!  Here is one of my favorite crafts of all time!  I created this little guy last week for The Scrap Shoppe's Homemade Christmas event!  I think he is just the cutest!  Here is the post in case you missed it over at Michele's. :)

Hello Scrap Shoppers!  I'm so happy to be back for another week of Homemade Christmas!  I'm Erin from Crafts & Sutch.  
I'm a crafty girl at heart and love Christmastime!  I especially love decorating my home for the holidays!  Today we are making a super duper cutie pie snowman out of an upcycled sweater!  Are you ready?


To get started, you will need the sleeve of an old sweater, fiberfill, a glue gun and glue, a wooden spool painted black, two small black buttons, two small holly leaves cut from green felt, a small red button, an orange triangle cut from felt, ribbon, and scissors.  Not pictured:  black felt circle and a scrap of fabric.  Disregard the needle and thread...I made this cutie no sew!


Turn the sleeve inside out and tie a knot around the wrist end of the sweater.


Turn the sleeve right side out and begin to fill with the fiberfill.  This is the snowman's head.  Once it is filled to your desired size, tie a knot directly under the filling.


Fill the body with the fiberfill.


After the body is stuffed, turn your snowman on his head and fold and glue the opening closed. 


I folded it like a present.


This is what you should have so far.


I wanted my snowman to appear a little more "schmooshed," so I glued the head down to the body.


See?  Definitely more "schmooshed" and cuter!  :)  Glue on the black, button eyes and orange, felt nose.


 To create the top hat, glue the wooden spool to the top of the black felt circle.


Add a holly embellishment to the top hat by gluing on the green leaves and the red button.


Glue the top hat on his head.


For the finishing touch, tie a scrap piece of fabric around his neck.  I cut little slits on each end of the scarf to look like tassels.

Isn't he adorable?  I just love him sitting in the little winter wonderland on top of my fridge!  He might need a girlfriend. :)  It would be super easy to change this little guy up by adding different embellishments...perhaps twig arms, a crocheted scarf, or a tiny little pipe?

I wish you all a very Merry Christmas and a happy holiday!  I hope you'll stop by Crafts & Sutch to say hi!  Michele, thanks so much for letting me come visit again!  I had too much fun!

I'm linking up to these spectacular parties!

Photobucket

Sunday, December 12, 2010

Sweater Trees

Howdy!  I hope you've had a most wonderful weekend!  I've been trying to get all of the presents wrapped and under the tree.  I'm such a procrastinator when it comes to wrapping.  I've been know to shove presents and tissue paper into Christmas bags outside my mom's house on Christmas Eve right before we open gifts.  :)

In case you missed me over at Pocket Full of Pink last week, here is the tutorial I shared on upcycling sweaters into Christmas decor!

Hello Pocket Full of Pink Readers!  I'm Erin from Crafts & Sutch and I'm so very happy to spend some time with you today!
I love all things crafty and have been diagnosed with "I can make that" syndrome. I am constantly inspired by the things I see, so I like to create a little bit of everything. :) Today we are getting into the holiday spirit and making some sweater trees!


To get started, you will need a paper mache or Styrofoam tree form, an old sweater, scissors, a glue gun and glue, straight pins, and a pencil or pen.


Lay the tree form down on the sleeve of the sweater with the top of the tree at the wrist end of the sweater.  Cut across the sleeve approximately 1" below the end of the tree.


Put the tree into the sleeve and create a slip cover for it by pinning down the length of the tree.  The sweater should be snug, but not tight.


Now fold the end of the sweater under the form and glue with the glue gun.


Remove the excess sweater by cutting along the inside of your pins.


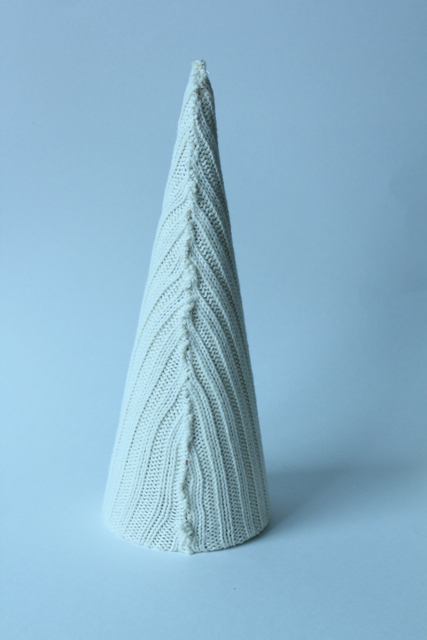
It will look like this.  Take the pencil or pen and draw a straight guideline for yourself down the length of the tree.  This is where you will glue the sweater together.


Glue the sweater along the guideline.  Create a neat seam by pushing each side together.


This is what the back of the tree will look like after you have glued the sweater in place.


And here is the finished product...along with a friend!  I am loving how these turned out.  They were super easy to make, quick, and affordable!


Thank you so much for letting me hang out with you today and thank you to Karen for having me!  I hope you all will stop by Crafts & Sutch sometime and say hi! :)

I'm linking up to these awesome parties!

Photobucket

Monday, December 6, 2010

Blog Swap {Pocket Full of Pink}

Hello Dear Friends! :)  I hope you had a most excellent weekend!  I finally got my Christmas decorations up!  YAY!  You'll be seeing them later this week.  In the meantime, I'm swapping blogs with Karen from a Pocket Full of Pink!  She's hanging here today and I'm hanging there.  :)


I am so excited to be here on Crafts and Sutch. Thanks for having me Erin!  My name is Karen and my blog is Pocket Full of Pink.  I love to make crafts, have giveaways, and have lots of fun!  Come by and visit sometime!

I came up with this super cute and EASY paper Christmas tree.  Here is what you need:

-2-12 x 12 sheets of Christmas Scrapbook paper, or whatever design you want.
-Glue Gun
-paper mache tree (you can get them from Oriental Trading), or a syrofoam tree (from Joann's or Hobby Lobby or Michaels) will work too.
-paper cutter
-ribbon
-paint (if you are using a paper mache tree with stand like mine.)  I used Delta Ceramcoat- Burnt Umber
-pencil

1.  Cut your paper into strips about 1/2 x 2 1/2 inches.  You will use just about all of the 2 sheets of paper.


2. Take your paper and roll it around the pencil nice and tight.


3.  Start gluing the paper strips on with a glue gun.  Careful and don't burn yourself.  Trust me I know from experience!  Go all the way around the tree.  Move up to the next layer, making sure there is no white showing through.  When you glue on the next layers, do it randomly, so they don't look like straight rows.  Make sense?


4.  If you use a paper mache tree, paint the stick and the bottom brown.  I also sanded around the edges of the pot (or whatever that thing is!) a little.

  
5.  Glue a pretty ribbon on top.


This took me a little over an hour to do.  I love how it turned out and it didn't cost me anything.  It was stuff I already had on hand!

Thanks so much for having me Erin!  Stop by and check out my blog sometime.  I love visitors!
Isn't this the cutest?!  I love how she used double-sided paper so you can see the light green peeking through the rolls.  Karen, thanks so much for sharing this little guy!  Please be sure to go and visit Karen at a Pocket Full of Pink!  She always has great paper crafts and giveaways!


Photobucket

Monday, November 15, 2010

Fall Decorating {Mantle}

Hello and happy Monday!  I hope you all had a wonderful weekend!  Mine had a rocky start with a sick baby, but got better and better throughout the weekend. 

Last night I finally finished up my mantle!  I had taken down the Halloween stuff at the beginning of the month but struggled with this look until now.  :)

The staple on the mantle throughout the fall is the berry garland.  It is full of red, orange, and yellow berries and I stuff it a little more with fall leaves, and small pumpkins and gourds.  Then I pulled out this antique window pane (which has been sitting in my garage since I bought it a few years ago) and hung a beautiful fall wreath from the top with an orange ribbon. 

On either side of the window pane, sit chocolate pumpkins (see side note below), glass beaded pumpkins, and sunflowers.


Side note:  Do you ever feel like you share crafty brain waves with someone?  :)  Sometimes I'm hunting around blogland and see a project that is exactly what I had envisioned making or someone will leave a comment, "I was just going to make that!"  It goes to show you that great minds think alike!  I think Michele, from The Scrap Shoppe, and I were sharing crafty brain waves when we both decided to spray paint pumpkins brown!  Check out her's HERE.  She turned her brown pumpkin into a fall vase.


I decided to give these guys a coat of spray paint because they were cream and got lost against the creamy wall.  I wanted something dark and appropriate for fall so brown was the way to go (plus I already had a can from spray painting Kason's nursery furniture).  Then I dressed each one up with an orange ribbon.


Coming up this week:  Sutch an Inspiration, my fall credenza, and our Christmas card! :)  Have a fantastic week!


Photobucket