Showing posts with label ribbon. Show all posts

Sunday, March 20, 2011

Baby Shower Decorations to Decor

Hello, Friends!  Happy spring!  How was your weekend?  :)  I'm sorry I've been MIA.  The monkey was sick last week and was in need of some extra Mommy time, so my "fun" job (and my real job) were put on a bit of a hold.  We had a wonderful weekend that ended with a family dinner at our casa.  The hubs, the monkey, two Memas, one Nonno, one Papa, me, a pot of spaghetti, a big bowl of salad, and two pies made for one perfect evening! :)

Last weekend a friend of mine hosted a baby shower for her sister and she asked if I would make a few decorations.  The theme was "Under the Sea" to match the nursery.  I used the bedding as color and image inspiration.  Take a peek:
Isn't it too cute?!  I just love that little octopus.  He is adorable!

My first project was inspired by Michele over at The Scrap Shoppe.  She made these diaper and washcloth cupcakes!  I had never seen them before and instantly knew that they would soon become my GO TO baby shower craft.


I followed Michele's easy tutorial and ended up these cuties.  I wish with all my might I could have found my pinking shears (I hunted for a new pair, but wasn't willing to spend $25 dollars on scissors...I just couldn't do it).  I think the pinking detail adds the perfect finishing touch!


I topped each cupcake off with a pom pom cherry!  An idea I got from Lindsey at BABY BOKY.

Then I made a banner to display at the shower and then move to baby Ian's room when he comes home.  I used chip board circles that I got from the $1 bins at Michael's (all 5 for a $1).


For the octopus and turtle on each end, I uploaded the bedding image into Photoshop, used it to generate a black and white image, converted it to a .svg file using InkScape, and then cut the image using my Cricut.  It sounds super complicated, but it's just a matter of a few clicks.  Once the image was cut, I used a marker to add the detail.  Again, I used the bedding as my guide.


I tied it all together with some "bubble" ribbon.

Next, I made a diaper wreath to greet guests as they came to the shower.  This wreath would also look adorable hanging from the hospital room door and then the "I" can be removed and used as a door decoration for Ian's nursery.


I also made a signature frame so guests could sign with their welcoming wishes for baby Ian.  It's great for mommy to take to the hospital too.  This is a super easy and affordable keepsake.  I was able to make this 11x14 keepsake frame for less than $15.


Of course, you know I had to make Ian his own stylish freezer paper stenciled onesies!  I was inspired to create the "I" onesie by one I saw over at Gabriel's Good Tidings.  The star print onesie got a rockin' guitar and the nautical stripe onesie got a super cute whale.  These were a fabulous find at Wal-Mart for just $2 each.


I love to create decor that serves double duty for mommy and baby later!  Everything can be used as decor in the nursery or by baby after the shower!

Photobucket

Tuesday, January 18, 2011

Sweetheart Wreath

Hello Dear Friends!  I hope all is well!  I'm sorry for my lack of posts this past week.  I have been traveling quite a bit for my "real world" job, and have had a hard time getting to the computer for my "fun" job. :)

Do you guys normally decorate for Valentine's Day?  I never have before, but I think it would be fun to have some sweet decor around the house to remind us all to give a little love.

I love those little conversation hearts and I love a good wreath, so I thought why not put these two loves together to create a new one. :)


I don't have a step-by-step tutorial for this one, but it was super duper easy to make.  I started with a round wreath form that was flat on all sides (round and flat?  LOL).  Then I wrapped the wreath in strips of pink tissue paper.  I hot glued on rows of Sweethearts on all sides and finished it off with a pink, satin ribbon.


I started gluing the hearts to the front first, then the inside, and finally the outside.  It took about four 7 oz. bags of conversation hearts and about an hour and a half to complete.  I just sat down in front of the TV and glued away.


I found that it was easiest to make one row of hearts all the way around the wreath, and then move on to the second and third rows (rather than gluing three across, then three below that row, and repeating the process all the way around the wreath).


I might have the sweetest wreath in town...literally! :)  ...and on a side note, I'm pretty sure I got about 437 cavities while completing this project. :)

I'll be linking up to these SWEET parties! :)


Photobucket

Monday, December 6, 2010

Blog Swap {Pocket Full of Pink}

Hello Dear Friends! :)  I hope you had a most excellent weekend!  I finally got my Christmas decorations up!  YAY!  You'll be seeing them later this week.  In the meantime, I'm swapping blogs with Karen from a Pocket Full of Pink!  She's hanging here today and I'm hanging there.  :)


I am so excited to be here on Crafts and Sutch. Thanks for having me Erin!  My name is Karen and my blog is Pocket Full of Pink.  I love to make crafts, have giveaways, and have lots of fun!  Come by and visit sometime!

I came up with this super cute and EASY paper Christmas tree.  Here is what you need:

-2-12 x 12 sheets of Christmas Scrapbook paper, or whatever design you want.
-Glue Gun
-paper mache tree (you can get them from Oriental Trading), or a syrofoam tree (from Joann's or Hobby Lobby or Michaels) will work too.
-paper cutter
-ribbon
-paint (if you are using a paper mache tree with stand like mine.)  I used Delta Ceramcoat- Burnt Umber
-pencil

1.  Cut your paper into strips about 1/2 x 2 1/2 inches.  You will use just about all of the 2 sheets of paper.


2. Take your paper and roll it around the pencil nice and tight.


3.  Start gluing the paper strips on with a glue gun.  Careful and don't burn yourself.  Trust me I know from experience!  Go all the way around the tree.  Move up to the next layer, making sure there is no white showing through.  When you glue on the next layers, do it randomly, so they don't look like straight rows.  Make sense?


4.  If you use a paper mache tree, paint the stick and the bottom brown.  I also sanded around the edges of the pot (or whatever that thing is!) a little.

  
5.  Glue a pretty ribbon on top.


This took me a little over an hour to do.  I love how it turned out and it didn't cost me anything.  It was stuff I already had on hand!

Thanks so much for having me Erin!  Stop by and check out my blog sometime.  I love visitors!
Isn't this the cutest?!  I love how she used double-sided paper so you can see the light green peeking through the rolls.  Karen, thanks so much for sharing this little guy!  Please be sure to go and visit Karen at a Pocket Full of Pink!  She always has great paper crafts and giveaways!


Photobucket

Friday, November 19, 2010

Fall Decorating {Credenza}

Happy Friday!  I'm so ready for this weekend!  We are celebrating Thanksgiving with my mom and sister early this year, so I'll be chowing down some turkey in two, short days!  Woowho!

I've decided that my home is as decorated as it's going to get for fall.  Here is a little vignette I put together on top of the credenza in my entryway.


I won this adorable Itz Fitz wreath a few months ago over at Mandpidy. 


A wire pumpkin, a bundle of wheat, and a raffia-wrapped antique spool acting as a vase are grouped together on one side of the credenza.


While this fantastic fall tree topiary, chocolate pumpkin, and Itz Fitz wreath sit clustered together on the other side.


I love seeing this as soon as I come in the front door.  It makes me happy!


As much as I love all of my fall decorations, they will be coming down this week to make room for Christmas!  :)  Have a wonderful weekend!


Photobucket

Friday, November 12, 2010

Fall Breakfast Table

I love this time of year.  I love the colors.  I love wearing warm and cozy sweaters and boots (haven't been able to do this just yet).  I love to fill my home with fall and all it's elements.

I bought these place mats on clearance at Kohl's a couple of years ago.  The variety of shapes and colors is a very "me" thing...just take a peek at my chairs. :)


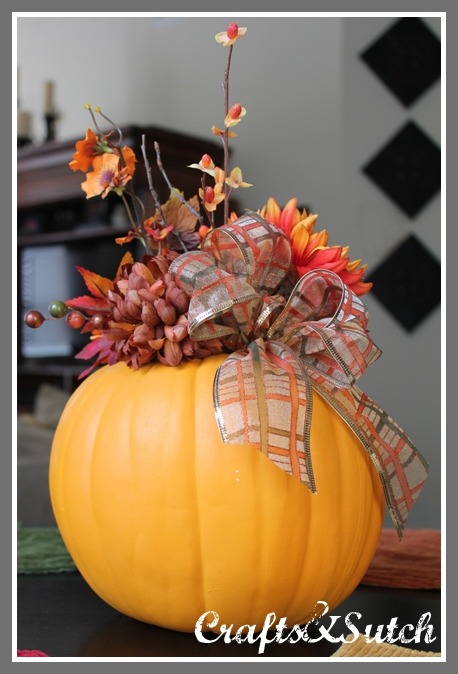
My mom and I made some pumpkin center pieces for friends and ourselves a couple of years ago (another Ike crafting day).  We bought all of our supplies at Garden Ridge on sale BB (before blogging).  We cut a hole in the top of carvable pumpkins, filled them with fall colored flowers and berries, and finished them off with big, beautiful bows.  They turned out spectacularly!


I spied a few similar pumpkin center pieces at Michael's the other day with an $80.00 price tag (they didn't look as good as ours... :) just saying).  Wowza!  Don't be afraid to make your own.  If it doesn't look right the first time, take the pieces out and try again (the little block of floral foam in the middle of that pumpkin has too many holes to count).

I'll be linking up to some of my favorite parties found HERE!

Photobucket

Monday, October 18, 2010

Mossy Fall Plaques

Hello, All!  Happy Monday!  I hope you had a great weekend!  We were able to spend time with family and that is always a good thing. :)

For this week's EEK WEEKS project, I thought I would tone it down and make something natural that could be displayed in your home for the entire season.


I'm sorry I do not have a full photo tutorial, but this was super easy to make so I'll just talk you through it. :)


You will need three wood plaques, spray paint (I used brown), scrapbook paper, Mod Podge, craft foam brush, scissors, moss sheet, ribbon, and a hot glue gun.  Optional supplies:  distressing ink and jute.

To begin, spray the plaques with spray paint.  While the paint is drying, cut out fall shapes from the moss sheet.  Have you seen this stuff?  I found it at the Dollar Tree, and I only used one sheet for this project!


I found images of a pumpkin, an acorn, and a leaf on Google images, printed them out, cut around the images, and used the cut outs as stencils to cut the moss sheet.

Measure the top of the wooden plaque and cut the scrapbook paper to fit, distress the edges of the paper with ink, and then Mod Podge the paper to the plaque.

Hot glue the moss to the plaque and embellish with jute (a curly vine for the pumpkin, a rim for the cap of the acorn, and veins for the leaf).

 Hot glue ribbon to the back of the plaque and hang on a nail.  I really wanted to hang the plaques from decorative knobs, but wanted to keep my budget in mind so I hot glued a button to the end of each nail.  Personally, I think it is my favorite part of the project! :)


I'll be sharing this project at these super wonderful PARTIES!

I have to admit that I'm a little sad there is only one more EEK WEEK project left!  I do promise that is will be positively pumpkiny deliciousness!  :)

Coming up this week:  Sutch an Inspiration on Tuesday, a giveaway on Wednesday, and a look at some of the fall decorations around my home on Friday.  Have a wonderful week!


Photobucket

Saturday, September 25, 2010

A Sweet Necklace

Hey, Everyone!  I hope you are all enjoying a relaxing weekend!  I thought I would hop on while the little man is napping to show you a necklace that I made with the help of my friend, Kristyn.  Did you know that I make jewelry?  I know.  You would never know because I haven't made anything in a very long time.

Anywho, Kristyn wanted a unique and personal gift for a friend's birthday.  She picked out all of the components and helped with the design.  I think it is absolutely perfect.  I love that it is casual, but could easily be dressed up for an evening out and I especially love how the pendants are tied together in the center with a bow.  So sweet!  What do you think?  :)  Would you like to see some more jewels?


I hope to see you all back on Monday for EEK Weeks!  I have to tell you Monday's project is the best by far (to me anyways) and it's a double feature...not one, but two fantastically fall projects!  :)  Have a great rest of your weekend!

Linking up to all of my favorite parties HERE!


Photobucket